The Gentlemen Crafters Design Team - April Inspiration Blog Hop!
Welcome fellow stampers and friends~
Each month I have the pleasure of participating in The Gentlemen's Crafters Design Team Blog Hop! It is an International team of Stampin Up! male demonstrators and each month we get to share one of our creations across the World.
As a demonstrator, I am able to preorder / purchase certain NEW products that will be featured in our new annual catalog. I am very excited that I received my order in the mail the other day, just in time to create something using some of the new products to share with you today!
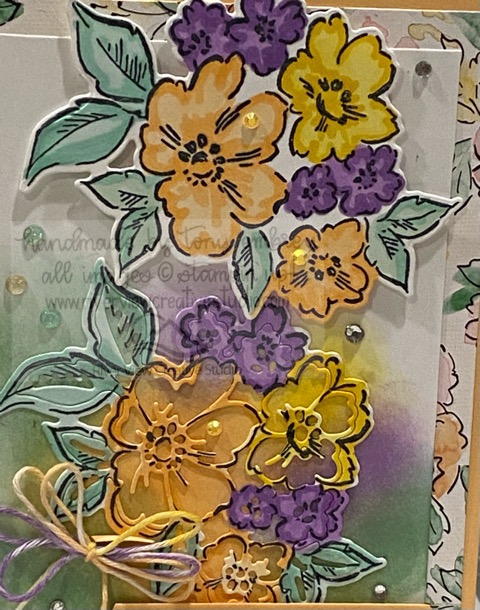
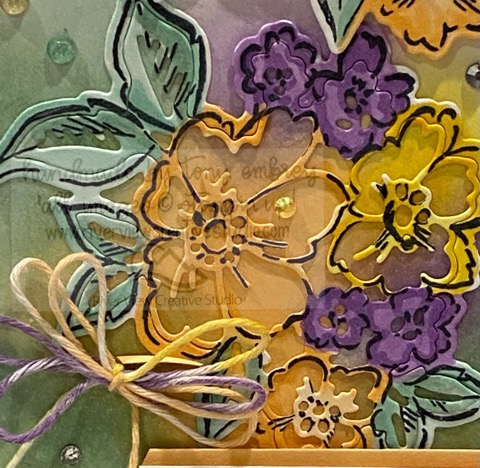
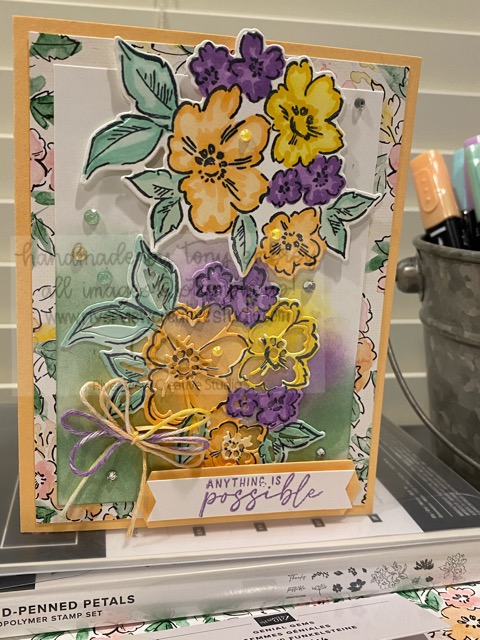
I cannot show you any photos of the actual catalog yet, but I am very excited about the Photopolymer stamp set Hand-Penned Petals and Penned Flowers Dies . When I placed my order I just couldn't wait to get it because I really enjoy the many options for cards and projects possible with this one. Let your imagination soar! I've only played with it for a few hours, but long enough to create something to share with you in my blog entry. There are just so many different ways to use this set, I played with vellum for a bit too, but decided not to use it on this card.

Here are the products I used in addition to the bundle above (new):
Pale Papaya card stock
Pale Papaya Blends and ink pad
Hand Penned DSP
2021-2023 In color jewels
Genial Gems
Bakers Twine Essentials pack (white)
The additional items I used:
Basic White card stock
Rhinestone gems
Highland Heather blends and ink pad
Mint Macaron Blends and ink pad
Pool Party blends and ink pad
Daffodil Delight blends and ink pad
Instructions:
I know most of you probably don't need specific directions, but please feel free to use and share them.
Cut Card Stock 5 1/2" x 8 1/2", score 4 1/4" (Pale Papaya)
Cut DSP 5 1/4" x 4" (Hand Penned DSP) and Basic White
Cut Basic White card stock 4 3/4" x 3 1/2"
Cut (2) Basic White 3" x 4" and stamp the image using Memento Black.
Using the Blends outline and color one of the images and using the same flower shape, die cut using only the outline shape.
Using the outline and the insert die, cut out another flower shape and clean out all the punched shapes. For this set, using blends color in what remains. Here is the cool part: Decide how you want to lay out the card front on the 4 3/4" x 3 1/2" Basic White card stock. Looking at the photo, I used daubers to scrub on some of the colors that I wanted to show through my cut out image. Have fun with it, it's not meant to be exact, let you inner artist out and play. If you're not sure how you want it, just pull out some scrap white paper and practice with the daubers and the ink pads.
When you're finished, adhere the bottom image with glue of choice, and pop up the top image using Stampin' dimensionals.
For the bow I colored the white twine with the blends before making the bow. Adhere it where you like it or look at the photo. Add some gems and your sentiment of choice. I chose to use "anything is possible" and layered 1/2" white over 3/4" pale papaya both popped up with dimensionals.
I hope you've enjoyed seeing this project, and perhaps you'll be inspired to consider this bundle when you get our new catalog. I would love to hear your reaction and any comments, feel free to share them below.
Also click on one of the names below to take you on to another exciting blog in the hop!
Until next time!~ happy stamping and God Bless!
Tony
Product List


 Barry Selwood & Jay Soriano
Bruno Bertucci (not participating this month)
Daniel Nickeson
Jason Loucks
Kevin Estey
Martin Stone
Rene Guenther
Each month I have the pleasure of participating in The Gentlemen's Crafters Design Team Blog Hop! It is an International team of Stampin Up! male demonstrators and each month we get to share one of our creations across the World.
As a demonstrator, I am able to preorder / purchase certain NEW products that will be featured in our new annual catalog. I am very excited that I received my order in the mail the other day, just in time to create something using some of the new products to share with you today!
I cannot show you any photos of the actual catalog yet, but I am very excited about the Photopolymer stamp set Hand-Penned Petals and Penned Flowers Dies . When I placed my order I just couldn't wait to get it because I really enjoy the many options for cards and projects possible with this one. Let your imagination soar! I've only played with it for a few hours, but long enough to create something to share with you in my blog entry. There are just so many different ways to use this set, I played with vellum for a bit too, but decided not to use it on this card.
Here are the products I used in addition to the bundle above (new):
Pale Papaya card stock
Pale Papaya Blends and ink pad
Hand Penned DSP
2021-2023 In color jewels
Genial Gems
Bakers Twine Essentials pack (white)
The additional items I used:
Basic White card stock
Rhinestone gems
Highland Heather blends and ink pad
Mint Macaron Blends and ink pad
Pool Party blends and ink pad
Daffodil Delight blends and ink pad
Instructions:
I know most of you probably don't need specific directions, but please feel free to use and share them.
Cut Card Stock 5 1/2" x 8 1/2", score 4 1/4" (Pale Papaya)
Cut DSP 5 1/4" x 4" (Hand Penned DSP) and Basic White
Cut Basic White card stock 4 3/4" x 3 1/2"
Cut (2) Basic White 3" x 4" and stamp the image using Memento Black.
Using the Blends outline and color one of the images and using the same flower shape, die cut using only the outline shape.
Using the outline and the insert die, cut out another flower shape and clean out all the punched shapes. For this set, using blends color in what remains. Here is the cool part: Decide how you want to lay out the card front on the 4 3/4" x 3 1/2" Basic White card stock. Looking at the photo, I used daubers to scrub on some of the colors that I wanted to show through my cut out image. Have fun with it, it's not meant to be exact, let you inner artist out and play. If you're not sure how you want it, just pull out some scrap white paper and practice with the daubers and the ink pads.
When you're finished, adhere the bottom image with glue of choice, and pop up the top image using Stampin' dimensionals.
For the bow I colored the white twine with the blends before making the bow. Adhere it where you like it or look at the photo. Add some gems and your sentiment of choice. I chose to use "anything is possible" and layered 1/2" white over 3/4" pale papaya both popped up with dimensionals.
I hope you've enjoyed seeing this project, and perhaps you'll be inspired to consider this bundle when you get our new catalog. I would love to hear your reaction and any comments, feel free to share them below.
Also click on one of the names below to take you on to another exciting blog in the hop!
Until next time!~ happy stamping and God Bless!
Tony
Product List


Bruno Bertucci (not participating this month)
Daniel Nickeson
Jason Loucks
Kevin Estey
Martin Stone
Rene Guenther
Read More Great Posts In My Blog


Current Host Code
CODEGOESHERE
Upcoming Classes & Events
| Monthly Card Class 12 Aug 2024 02:00PM - 04:00PM |

Share This on Social Media
Latest Blog Posts
Newsletter Signup
Project Inspirations
.jpg)
.jpg)
.jpg)
.jpg)
.jpg)
.jpg)
.jpg)
.jpg)
.jpg)
.jpg)
.jpg)
.jpg)
.jpg)
.jpg)
.jpg)
.jpg)
.jpg)
.jpg)
.jpg)
.jpg)
.jpg)
.jpg)
.jpg)
.jpg)
.jpg)
.jpg)
.jpg)
.jpg)
.jpg)
.jpg)
.jpg)
.jpg)
.jpg)
.jpg)
.jpg)
.jpg)
.jpg)
.jpg)
.jpg)
.jpg)
.jpg)
.jpg)
.jpg)
.jpg)
.jpg)
.jpg)
.jpg)
.jpg)
.jpg)
.jpg)
.jpg)
.jpg)
.jpg)
.jpg)
.jpg)
.jpg)
.jpg)
.jpg)
.jpg)
.jpg)
.jpg)
.jpg)
.jpg)
.jpg)
.jpg)
.jpg)
.jpg)
.jpg)
.jpg)
.jpg)
.jpg)
.jpg)
.jpg)
.jpg)
.jpg)
.jpg)
.jpg)
.jpg)
.jpg)
.jpg)
.jpg)
.jpg)
.jpg)
.jpg)
.jpg)
.jpg)
.jpg)
.jpg)
.jpg)
.jpg)
.jpg)
.jpg)
.jpg)
.jpg)
.jpg)
.jpg)
.jpg)
.jpg)
.jpg)
.jpg)
.jpg)
.jpg)
.jpg)
.jpg)
.jpg)
.jpg)
.jpg)
.jpg)
.jpg)
.jpg)
.jpg)
.jpg)
.jpg)
.jpg)
.jpg)
.jpg)
.jpg)
.jpg)
.jpg)
.jpg)
.jpg)
.jpg)
.jpg)
.jpg)
.jpg)
.jpg)
.jpg)
.jpg)
.jpg)
.jpg)
.jpg)
.jpg)
.jpg)
.jpg)
.jpg)
.jpg)
.jpg)
.jpg)
.jpg)
.jpg)
.jpg)
.jpg)
.jpg)
.jpg)
.jpg)
.jpg)
.jpg)
.jpg)
.jpg)
.jpg)
.jpg)
.jpg)
.jpg)
.jpg)
.jpg)
.jpg)
.jpg)
.jpg)
.jpg)
.jpg)
.jpg)
.jpg)
.jpg)
.jpg)
.jpg)
.jpg)
.jpg)
.jpg)
.jpg)
.jpg)
.jpg)
.jpg)
.jpg)
.jpg)
.jpg)
.jpg)
.jpg)
.jpg)
.jpg)
.jpg)
.jpg)
.jpg)
.jpg)
.jpg)
.jpg)
.jpg)
.jpg)
.jpg)
.jpg)
.jpg)
.jpg)
.jpg)
.jpg)
.jpg)
.jpg)
.jpg)
.jpg)
.jpg)
.jpg)
.jpg)
.jpg)
.jpg)
.jpg)
.jpg)
.jpg)
.jpg)
.jpg)
Paper Pumpkin
Paper Pumpkin is the perfect monthly crafting kit for Everyone! No special skills or tools required. Each month a fully complete project kit arrives in a delightful box filled with stamps, ink, and paper—everything cut and ready to go so you can skip right to the fun.
TELL ME MORE SIGN ME UP!
TELL ME MORE SIGN ME UP!
Comments
a great card with the new products - I ordered this set straight away too.
Thank you for the inspiration.
Many greetings from Leipzig / Germany.
Rene