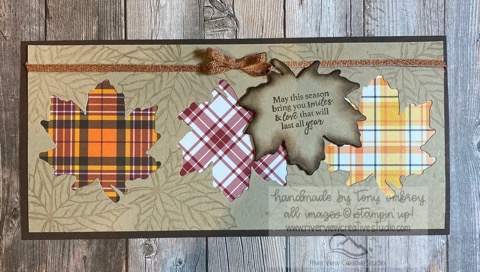
TGCDT: It's almost Fall Ya'll - A SlimLine Card
Hello fellow stampers and friends!
Thank you for checking out our August blog hop! The Gentlemen Crafters Design Team Blog Hop occurs monthly on the second Friday. Once you've checked out my project, I hope you will click on a link at the bottom of this post and go to the next Gentleman's creation.
My blog post features a returning favorite stamp and die bundle, "Gather Together". Summer is winding down and Fall is just around the corner! If you haven't had an opportunity to make a slimline card, I hope you will give it a go!
Happy Stampin'!
all the best-
Tony
Supplies used:
SU Gather Together bundle #153036
Plaid Tidings 6"x6" Designer Series Paper #153527
Basket Weave and Metallic Ribbon combo #153553
Whisper White Cardstock #100730
Early Espresso Cardstock #119686
Crumb Cake Cardstock #120953
Early Espresso stampin' pad #147114
Versamark Pad #102283
Instructions:
1. Cut Card Base: 8 1/2" x 8", score on short side at 4"
2. Cut Front and Inside card 8 1/4" x 3 3/4", one from Crumb Cake, one from Whisper White.
3. If desired, decorate the Whisper White inside using large Leaf stamp and Espresso ink pad; add a sentiment if desired and adhere to the inside of the card base with adhesive of choice.
4. Using Versamark stamp pad, Randomly stamp the large leaf stamp over the front of the crumb cake cardstock.
5. The three large leaf dies are spaced approximately 2 3/4" apart on the card front. You may mark off 2 3/4" blocks with light pencil to space equally then die cut. I turned the leave dies different directions to add interest. Save one of the cut out Leaf shapes for step 9.
6. Choose Plaid Tidings DSP and cut 2 3/4" x 2 3/4" squares and using tombow glue just around the leaf edges on back, adhere each piece of dsp.
7 Before adhering the Crumb Cake Card front, Make a bow and measure length of metallic ribbon across card front, tuck in and adhere to back with double sided tape.
8. Adhere Crumb Cake front to the Espresso card base.
9. Using one of the leaf shapes cut out of the Crumb Cake, stamp a sentiment and edge the leaf with Early Espresso Ink pad and a sponge. Adhere the leaf to the card using dimensionals.
10. The completed card will fit nicely in a #10 business envelope.
 We appreciate you taking time to visit all the truly talented crafters in this Blog-hop. Click a name below:
Barry and Jay
Bruno Bertucci
Daniel Nickeson
Ian Potter
Jason Loucks
Kevin Estey
Martin Stone
Rene Guenther
Tony Embrey
Thank you for checking out our August blog hop! The Gentlemen Crafters Design Team Blog Hop occurs monthly on the second Friday. Once you've checked out my project, I hope you will click on a link at the bottom of this post and go to the next Gentleman's creation.
My blog post features a returning favorite stamp and die bundle, "Gather Together". Summer is winding down and Fall is just around the corner! If you haven't had an opportunity to make a slimline card, I hope you will give it a go!
Happy Stampin'!
all the best-
Tony
Supplies used:
SU Gather Together bundle #153036
Plaid Tidings 6"x6" Designer Series Paper #153527
Basket Weave and Metallic Ribbon combo #153553
Whisper White Cardstock #100730
Early Espresso Cardstock #119686
Crumb Cake Cardstock #120953
Early Espresso stampin' pad #147114
Versamark Pad #102283
Instructions:
1. Cut Card Base: 8 1/2" x 8", score on short side at 4"
2. Cut Front and Inside card 8 1/4" x 3 3/4", one from Crumb Cake, one from Whisper White.
3. If desired, decorate the Whisper White inside using large Leaf stamp and Espresso ink pad; add a sentiment if desired and adhere to the inside of the card base with adhesive of choice.
4. Using Versamark stamp pad, Randomly stamp the large leaf stamp over the front of the crumb cake cardstock.
5. The three large leaf dies are spaced approximately 2 3/4" apart on the card front. You may mark off 2 3/4" blocks with light pencil to space equally then die cut. I turned the leave dies different directions to add interest. Save one of the cut out Leaf shapes for step 9.
6. Choose Plaid Tidings DSP and cut 2 3/4" x 2 3/4" squares and using tombow glue just around the leaf edges on back, adhere each piece of dsp.
7 Before adhering the Crumb Cake Card front, Make a bow and measure length of metallic ribbon across card front, tuck in and adhere to back with double sided tape.
8. Adhere Crumb Cake front to the Espresso card base.
9. Using one of the leaf shapes cut out of the Crumb Cake, stamp a sentiment and edge the leaf with Early Espresso Ink pad and a sponge. Adhere the leaf to the card using dimensionals.
10. The completed card will fit nicely in a #10 business envelope.
We appreciate you taking time to visit all the truly talented crafters in this Blog-hop. Click a name below:Barry and Jay
Bruno Bertucci
Daniel Nickeson
Ian Potter
Jason Loucks
Kevin Estey
Martin Stone
Rene Guenther
Tony Embrey
Add comment
Read More Great Posts In My Blog


Current Host Code
CODEGOESHERE
Upcoming Classes & Events
| Monthly Card Class 12 Aug 2024 02:00PM - 04:00PM |

Share This on Social Media
Latest Blog Posts
Newsletter Signup
Project Inspirations
.jpg)
.jpg)
.jpg)
.jpg)
.jpg)
.jpg)
.jpg)
.jpg)
.jpg)
.jpg)
.jpg)
.jpg)
.jpg)
.jpg)
.jpg)
.jpg)
.jpg)
.jpg)
.jpg)
.jpg)
.jpg)
.jpg)
.jpg)
.jpg)
.jpg)
.jpg)
.jpg)
.jpg)
.jpg)
.jpg)
.jpg)
.jpg)
.jpg)
.jpg)
.jpg)
.jpg)
.jpg)
.jpg)
.jpg)
.jpg)
.jpg)
.jpg)
.jpg)
.jpg)
.jpg)
.jpg)
.jpg)
.jpg)
.jpg)
.jpg)
.jpg)
.jpg)
.jpg)
.jpg)
.jpg)
.jpg)
.jpg)
.jpg)
.jpg)
.jpg)
.jpg)
.jpg)
.jpg)
.jpg)
.jpg)
.jpg)
.jpg)
.jpg)
.jpg)
.jpg)
.jpg)
.jpg)
.jpg)
.jpg)
.jpg)
.jpg)
.jpg)
.jpg)
.jpg)
.jpg)
.jpg)
.jpg)
.jpg)
.jpg)
.jpg)
.jpg)
.jpg)
.jpg)
.jpg)
.jpg)
.jpg)
.jpg)
.jpg)
.jpg)
.jpg)
.jpg)
.jpg)
.jpg)
.jpg)
.jpg)
.jpg)
.jpg)
.jpg)
.jpg)
.jpg)
.jpg)
.jpg)
.jpg)
.jpg)
.jpg)
.jpg)
.jpg)
.jpg)
.jpg)
.jpg)
.jpg)
.jpg)
.jpg)
.jpg)
.jpg)
.jpg)
.jpg)
.jpg)
.jpg)
.jpg)
.jpg)
.jpg)
.jpg)
.jpg)
.jpg)
.jpg)
.jpg)
.jpg)
.jpg)
.jpg)
.jpg)
.jpg)
.jpg)
.jpg)
.jpg)
.jpg)
.jpg)
.jpg)
.jpg)
.jpg)
.jpg)
.jpg)
.jpg)
.jpg)
.jpg)
.jpg)
.jpg)
.jpg)
.jpg)
.jpg)
.jpg)
.jpg)
.jpg)
.jpg)
.jpg)
.jpg)
.jpg)
.jpg)
.jpg)
.jpg)
.jpg)
.jpg)
.jpg)
.jpg)
.jpg)
.jpg)
.jpg)
.jpg)
.jpg)
.jpg)
.jpg)
.jpg)
.jpg)
.jpg)
.jpg)
.jpg)
.jpg)
.jpg)
.jpg)
.jpg)
.jpg)
.jpg)
.jpg)
.jpg)
.jpg)
.jpg)
.jpg)
.jpg)
.jpg)
.jpg)
.jpg)
.jpg)
.jpg)
.jpg)
.jpg)
.jpg)
.jpg)
.jpg)
.jpg)
.jpg)
.jpg)
.jpg)
Paper Pumpkin
Paper Pumpkin is the perfect monthly crafting kit for Everyone! No special skills or tools required. Each month a fully complete project kit arrives in a delightful box filled with stamps, ink, and paper—everything cut and ready to go so you can skip right to the fun.
TELL ME MORE SIGN ME UP!
TELL ME MORE SIGN ME UP!