Wind Down Wednesdays-Stamping with Tony - Basket of Blooms and more with Embossing Folders
Hello fellow stampers and Friends!
A lot of design time went in to todays projects. Sometimes I get an idea or two in my head but it takes a while to figure out how to make it happen in a card. Plus I may or may not have misplaced the stamp set I needed for tonight's project in my studio. Yes, it wasn't a Monday, but it was one of those days when I had more to do than time to do it.
But in the end no one died and the live video happened, I just ended up working out some of the design live. I think it's kind of fun, especially when it comes together, like tonight.
So I hope you will enjoy these two projects.
Supplies-precuts - Project 1 embossing folder
Supplies - precuts- Project 2 Basket of Blooms - Vase collection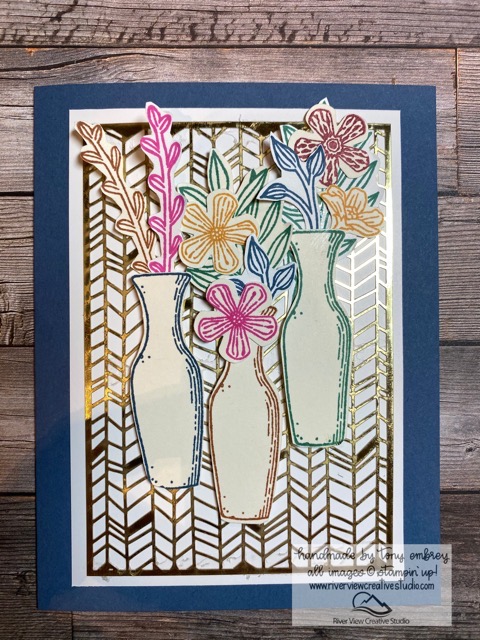
Happy Stamping! and God Bless! Tony
Product List


A lot of design time went in to todays projects. Sometimes I get an idea or two in my head but it takes a while to figure out how to make it happen in a card. Plus I may or may not have misplaced the stamp set I needed for tonight's project in my studio. Yes, it wasn't a Monday, but it was one of those days when I had more to do than time to do it.
But in the end no one died and the live video happened, I just ended up working out some of the design live. I think it's kind of fun, especially when it comes together, like tonight.
So I hope you will enjoy these two projects.
Supplies-precuts - Project 1 embossing folder
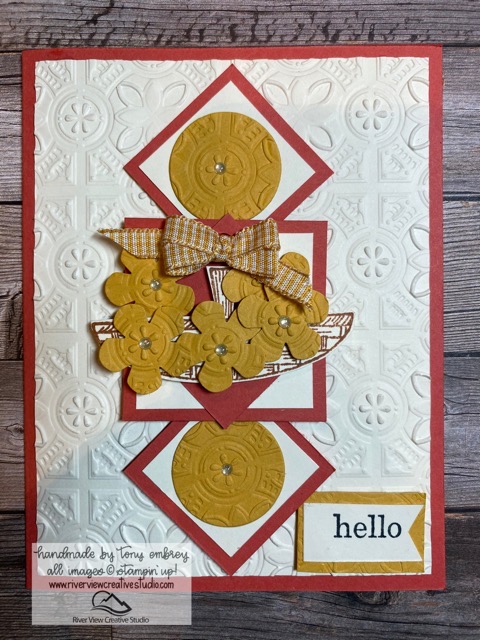
- cardstock card base - terracotta tile 8 1/2" x 5 1/2", scored at 4 1/4"
- Cardstock card front - Very Vanilla 5 1/4" x 4" Embossed using Tin Tile 3D
- Cardstock Bumblebee, embossed using Tin Tile 3D (to cut out)
- Cardstock Terracotta Tile Cut (3) 1 1/2" squares, (1) 2" square
- Cardstock Very Vanilla- Cut (2) 1 1/4" squares, (1) 1 3/4" square
- Layering Circle Dies - 1" circle, using embossed Bumble bee, cut (2) 1" circles, refer to photo/video
- Small Bloom punch - cut (5) flowers from Bumble bee embossed paper, round edges using bone folder
- stamp and fussy cut out basket in Basket of Blooms stamp set using Cinnamon Cider Ink pad
- Tie ribbon using Bumblebee Gingham ribbon
- Add jewels/embellishments as desired.
Supplies - precuts- Project 2 Basket of Blooms - Vase collection
- Cardstock card base - Misty Moonlight 8 1/2" x 5 1/2", scored at 4 1/4"
- Cardstock card front - Very Vanilla 5 1/4 x 4" Embossed using Subtle 3D folder
- Note if using a gold panel from Forever Gold Specialty Paper, then adjust size of above paper to give 1/8" edge larger than the gold panel. See photo for reference
- Stamp and cut 3 vase elements from the Basket of Blooms set, I used 2020-2022 In-Colors
- Stamp and fussy cut or punch out Flowers, leaves and stems of your choice or refer to photo.
- Using dimensionals and adhesive of choice assemble card, referring to photo or video for placement.
Happy Stamping! and God Bless! Tony
Product List


Add comment
Read More Great Posts In My Blog


Current Host Code
CODEGOESHERE
Upcoming Classes & Events
| Monthly Card Class 12 May 2024 02:00PM - 04:00PM |

Share This on Social Media
Latest Blog Posts
Newsletter Signup
Project Inspirations
.jpg)
.jpg)
.jpg)
.jpg)
.jpg)
.jpg)
.jpg)
.jpg)
.jpg)
.jpg)
.jpg)
.jpg)
.jpg)
.jpg)
.jpg)
.jpg)
.jpg)
.jpg)
.jpg)
.jpg)
.jpg)
.jpg)
.jpg)
.jpg)
.jpg)
.jpg)
.jpg)
.jpg)
.jpg)
.jpg)
.jpg)
.jpg)
.jpg)
.jpg)
.jpg)
.jpg)
.jpg)
.jpg)
.jpg)
.jpg)
.jpg)
.jpg)
.jpg)
.jpg)
.jpg)
.jpg)
.jpg)
.jpg)
.jpg)
.jpg)
.jpg)
.jpg)
.jpg)
.jpg)
.jpg)
.jpg)
.jpg)
.jpg)
.jpg)
.jpg)
.jpg)
.jpg)
.jpg)
.jpg)
.jpg)
.jpg)
.jpg)
.jpg)
.jpg)
.jpg)
.jpg)
.jpg)
.jpg)
.jpg)
.jpg)
.jpg)
.jpg)
.jpg)
.jpg)
.jpg)
.jpg)
.jpg)
.jpg)
.jpg)
.jpg)
.jpg)
.jpg)
.jpg)
.jpg)
.jpg)
.jpg)
.jpg)
.jpg)
.jpg)
.jpg)
.jpg)
.jpg)
.jpg)
.jpg)
.jpg)
.jpg)
.jpg)
.jpg)
.jpg)
.jpg)
.jpg)
.jpg)
.jpg)
.jpg)
.jpg)
.jpg)
.jpg)
.jpg)
.jpg)
.jpg)
.jpg)
.jpg)
.jpg)
.jpg)
.jpg)
.jpg)
.jpg)
.jpg)
.jpg)
.jpg)
.jpg)
.jpg)
.jpg)
.jpg)
.jpg)
.jpg)
.jpg)
.jpg)
.jpg)
.jpg)
.jpg)
.jpg)
.jpg)
.jpg)
.jpg)
.jpg)
.jpg)
.jpg)
.jpg)
.jpg)
.jpg)
.jpg)
.jpg)
.jpg)
.jpg)
.jpg)
.jpg)
.jpg)
.jpg)
.jpg)
.jpg)
.jpg)
.jpg)
.jpg)
.jpg)
.jpg)
.jpg)
.jpg)
.jpg)
.jpg)
.jpg)
.jpg)
.jpg)
.jpg)
.jpg)
.jpg)
.jpg)
.jpg)
.jpg)
.jpg)
.jpg)
.jpg)
.jpg)
.jpg)
.jpg)
.jpg)
.jpg)
.jpg)
.jpg)
.jpg)
.jpg)
.jpg)
.jpg)
.jpg)
.jpg)
.jpg)
.jpg)
.jpg)
.jpg)
.jpg)
.jpg)
.jpg)
.jpg)
.jpg)
.jpg)
.jpg)
.jpg)
.jpg)
.jpg)
.jpg)
.jpg)
.jpg)
Paper Pumpkin
Paper Pumpkin is the perfect monthly crafting kit for Everyone! No special skills or tools required. Each month a fully complete project kit arrives in a delightful box filled with stamps, ink, and paper—everything cut and ready to go so you can skip right to the fun.
TELL ME MORE SIGN ME UP!
TELL ME MORE SIGN ME UP!