TGCDT: July 2020 - The Heat Embossing Technique - Let's get to it!
Hello fellow stampers and friends!
Thank you for checking out our blog hop! The Gentlemen Crafters Design Team Blog Hop occurs monthly on the second Friday. This is my first month participating and I am so pleased to have been invited to be a part of this group.
This month marks the First Anniversary for the hop, and we have three NEW members, bringing our group of global stampers up to 9. Be sure to visit them all to see what inspirations they are sharing - links are at the bottom of this post.
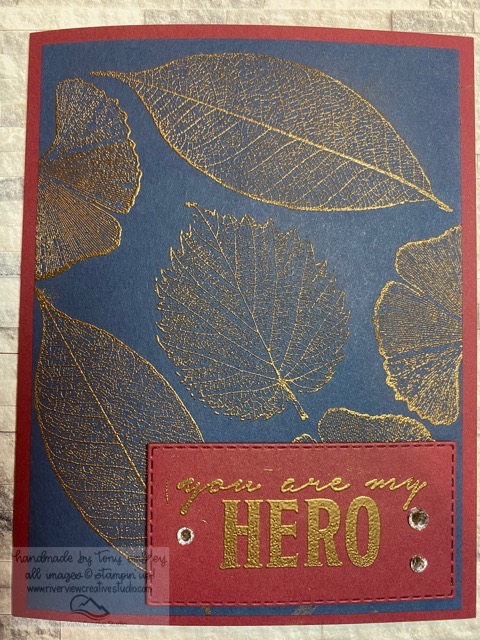
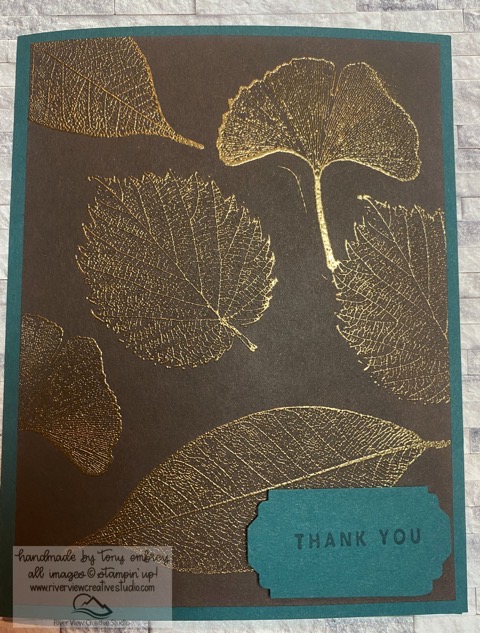
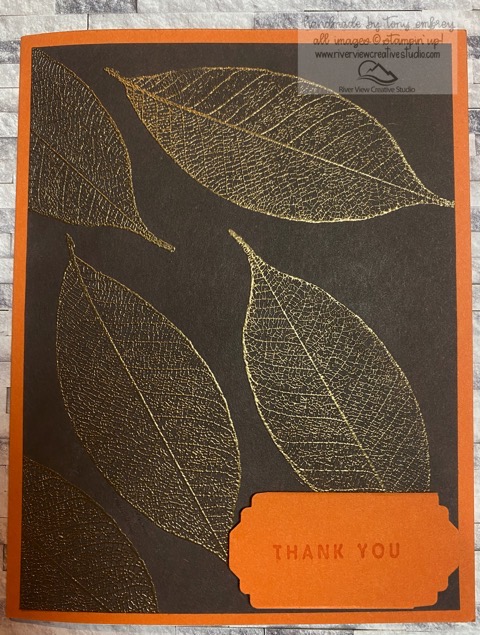
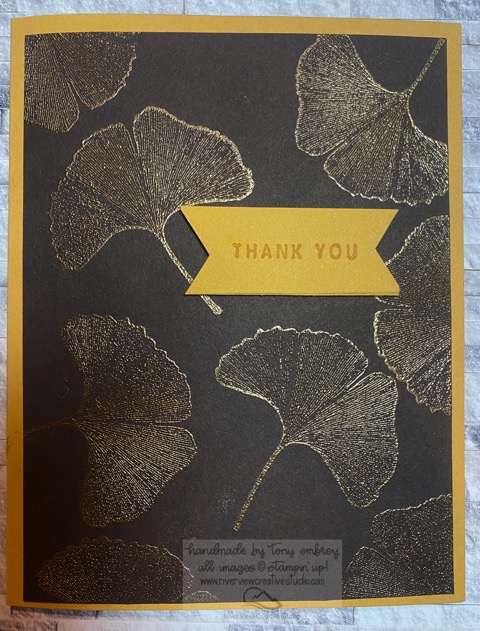
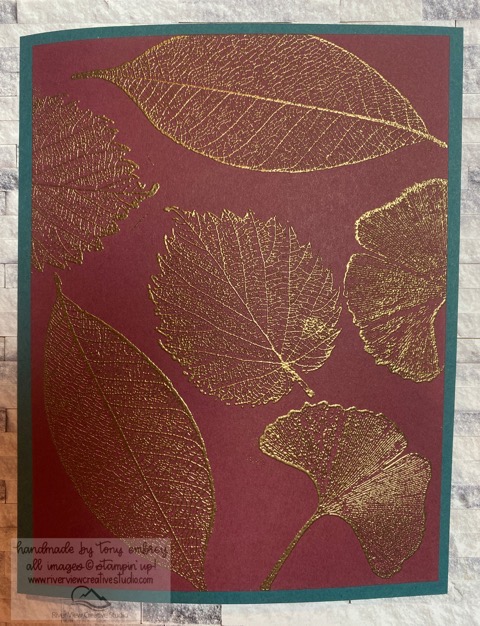
Today I am demonstrating an embossing technique using one of Stampin' up!'s brand new cling stamp sets from the 2020-21 annual catalog: Loyal Leaves, features three large leaf dies and several sentiments.
Supplies I am using for this project:
1.Merry Merlot Card stock, 8 1/2" x 5 1/2", scored at 4 1/4" on the long side.
2.Night of Navy card stock, 5 1/4" x 4" for the front of card and the
stamping/embossing.
3.Merry Merlot Card Stock, 1 1/2" x 2 3/4" for sentiment, I cut out using our rectangle
stitched framelit dies.
4. Gold embossing powder
5. Embossing buddy (retired) or dryer sheet (anti static)
6. Any faceted or your favorite embellishment for sentiment piece
7. Whisper White Card Stock 5 1/4" x 4" for inside of card.
8. Versamark stamp pad
9. Heat Tool
Instructions:
1. Attach the three large leaves to acrylic blocks.
2. Rub the embossing buddy or suitable substitute over the Night of Navy card stock.
3. Using the versamark stamp pad, stamp the images onto the Night of Navy card stock
in whatever design/order you desire or as shown in the video.
4. Apply the gold embossing powder over the image, being sure to cover all of the
stamped areas. note: it is helpful to have a paper plate to shake the excess powder
off the card. You may choose to do the sentiment card at the same time.
5. Apply heat to the design either from the underside or top of card, being careful
not to burn your fingers. I find it helpful to use a large tweezer to hold the card
when heat setting. The design is complete when the color changes and
looks shiny.
6. Using adhesive of your choice assemble the card, including inserting the card
whisper white blank inside.
I hope you have enjoyed creating this project!
Happy Stamping and God Bless!
Tony


We appreciate you taking time to visit all the truly talented
crafters in this Blog-hop. Click a name below:
Barry & Jay
Bruno Bertucci
Daniel Nickeson
Ian Potter
Jason Loucks
Kevin Estey
Martin Stone
Rene Guenther
Tony Embrey
Product List


")


Thank you for checking out our blog hop! The Gentlemen Crafters Design Team Blog Hop occurs monthly on the second Friday. This is my first month participating and I am so pleased to have been invited to be a part of this group.
This month marks the First Anniversary for the hop, and we have three NEW members, bringing our group of global stampers up to 9. Be sure to visit them all to see what inspirations they are sharing - links are at the bottom of this post.
Today I am demonstrating an embossing technique using one of Stampin' up!'s brand new cling stamp sets from the 2020-21 annual catalog: Loyal Leaves, features three large leaf dies and several sentiments.
Supplies I am using for this project:
1.Merry Merlot Card stock, 8 1/2" x 5 1/2", scored at 4 1/4" on the long side.
2.Night of Navy card stock, 5 1/4" x 4" for the front of card and the
stamping/embossing.
3.Merry Merlot Card Stock, 1 1/2" x 2 3/4" for sentiment, I cut out using our rectangle
stitched framelit dies.
4. Gold embossing powder
5. Embossing buddy (retired) or dryer sheet (anti static)
6. Any faceted or your favorite embellishment for sentiment piece
7. Whisper White Card Stock 5 1/4" x 4" for inside of card.
8. Versamark stamp pad
9. Heat Tool
Instructions:
1. Attach the three large leaves to acrylic blocks.
2. Rub the embossing buddy or suitable substitute over the Night of Navy card stock.
3. Using the versamark stamp pad, stamp the images onto the Night of Navy card stock
in whatever design/order you desire or as shown in the video.
4. Apply the gold embossing powder over the image, being sure to cover all of the
stamped areas. note: it is helpful to have a paper plate to shake the excess powder
off the card. You may choose to do the sentiment card at the same time.
5. Apply heat to the design either from the underside or top of card, being careful
not to burn your fingers. I find it helpful to use a large tweezer to hold the card
when heat setting. The design is complete when the color changes and
looks shiny.
6. Using adhesive of your choice assemble the card, including inserting the card
whisper white blank inside.
I hope you have enjoyed creating this project!
Happy Stamping and God Bless!
Tony
We appreciate you taking time to visit all the truly talented
crafters in this Blog-hop. Click a name below:
Barry & Jay
Bruno Bertucci
Daniel Nickeson
Ian Potter
Jason Loucks
Kevin Estey
Martin Stone
Rene Guenther
Tony Embrey
Product List


Add comment
Read More Great Posts In My Blog


Current Host Code
CODEGOESHERE

Upcoming Classes & Events
| Monthly Card Class 12 May 2024 02:00PM - 04:00PM |

Share This on Social Media
Latest Blog Posts
Newsletter Signup
Project Inspirations
.jpg)
.jpg)
.jpg)
.jpg)
.jpg)
.jpg)
.jpg)
.jpg)
.jpg)
.jpg)
.jpg)
.jpg)
.jpg)
.jpg)
.jpg)
.jpg)
.jpg)
.jpg)
.jpg)
.jpg)
.jpg)
.jpg)
.jpg)
.jpg)
.jpg)
.jpg)
.jpg)
.jpg)
.jpg)
.jpg)
.jpg)
.jpg)
.jpg)
.jpg)
.jpg)
.jpg)
.jpg)
.jpg)
.jpg)
.jpg)
.jpg)
.jpg)
.jpg)
.jpg)
.jpg)
.jpg)
.jpg)
.jpg)
.jpg)
.jpg)
.jpg)
.jpg)
.jpg)
.jpg)
.jpg)
.jpg)
.jpg)
.jpg)
.jpg)
.jpg)
.jpg)
.jpg)
.jpg)
.jpg)
.jpg)
.jpg)
.jpg)
.jpg)
.jpg)
.jpg)
.jpg)
.jpg)
.jpg)
.jpg)
.jpg)
.jpg)
.jpg)
.jpg)
.jpg)
.jpg)
.jpg)
.jpg)
.jpg)
.jpg)
.jpg)
.jpg)
.jpg)
.jpg)
.jpg)
.jpg)
.jpg)
.jpg)
.jpg)
.jpg)
.jpg)
.jpg)
.jpg)
.jpg)
.jpg)
.jpg)
.jpg)
.jpg)
.jpg)
.jpg)
.jpg)
.jpg)
.jpg)
.jpg)
.jpg)
.jpg)
.jpg)
.jpg)
.jpg)
.jpg)
.jpg)
.jpg)
.jpg)
.jpg)
.jpg)
.jpg)
.jpg)
.jpg)
.jpg)
.jpg)
.jpg)
.jpg)
.jpg)
.jpg)
.jpg)
.jpg)
.jpg)
.jpg)
.jpg)
.jpg)
.jpg)
.jpg)
.jpg)
.jpg)
.jpg)
.jpg)
.jpg)
.jpg)
.jpg)
.jpg)
.jpg)
.jpg)
.jpg)
.jpg)
.jpg)
.jpg)
.jpg)
.jpg)
.jpg)
.jpg)
.jpg)
.jpg)
.jpg)
.jpg)
.jpg)
.jpg)
.jpg)
.jpg)
.jpg)
.jpg)
.jpg)
.jpg)
.jpg)
.jpg)
.jpg)
.jpg)
.jpg)
.jpg)
.jpg)
.jpg)
.jpg)
.jpg)
.jpg)
.jpg)
.jpg)
.jpg)
.jpg)
.jpg)
.jpg)
.jpg)
.jpg)
.jpg)
.jpg)
.jpg)
.jpg)
.jpg)
.jpg)
.jpg)
.jpg)
.jpg)
.jpg)
.jpg)
.jpg)
.jpg)
.jpg)
.jpg)
.jpg)
.jpg)
.jpg)
.jpg)
.jpg)
.jpg)
.jpg)
Paper Pumpkin
Paper Pumpkin is the perfect monthly crafting kit for Everyone! No special skills or tools required. Each month a fully complete project kit arrives in a delightful box filled with stamps, ink, and paper—everything cut and ready to go so you can skip right to the fun.
TELL ME MORE SIGN ME UP!
TELL ME MORE SIGN ME UP!