Ready for Triangles and Chevrons? Trust me you will love the combo! Let's get to it!
Hello fellow stampers and friends-
As you may be aware I am doing two live facebook events a week, and I'm learning lots about how to make a video. I only hope at some point in the future I can look back and see that I have improved over these early attempts!
But I will say I am learning and I think, getting better, AND I'm having fun, and being creative, that's good (for me).
This week on "Wind Down Wednesday", I played with some new products and a new, to me design element, the Chevron.

When I first saw the paper folding it made me think of Origami and though it looks a little complicated, its easy. I had fun playing with colors, texture and patterns, designing the cards. I hope you will enjoy watching the video and maybe learning something new.
The first card :
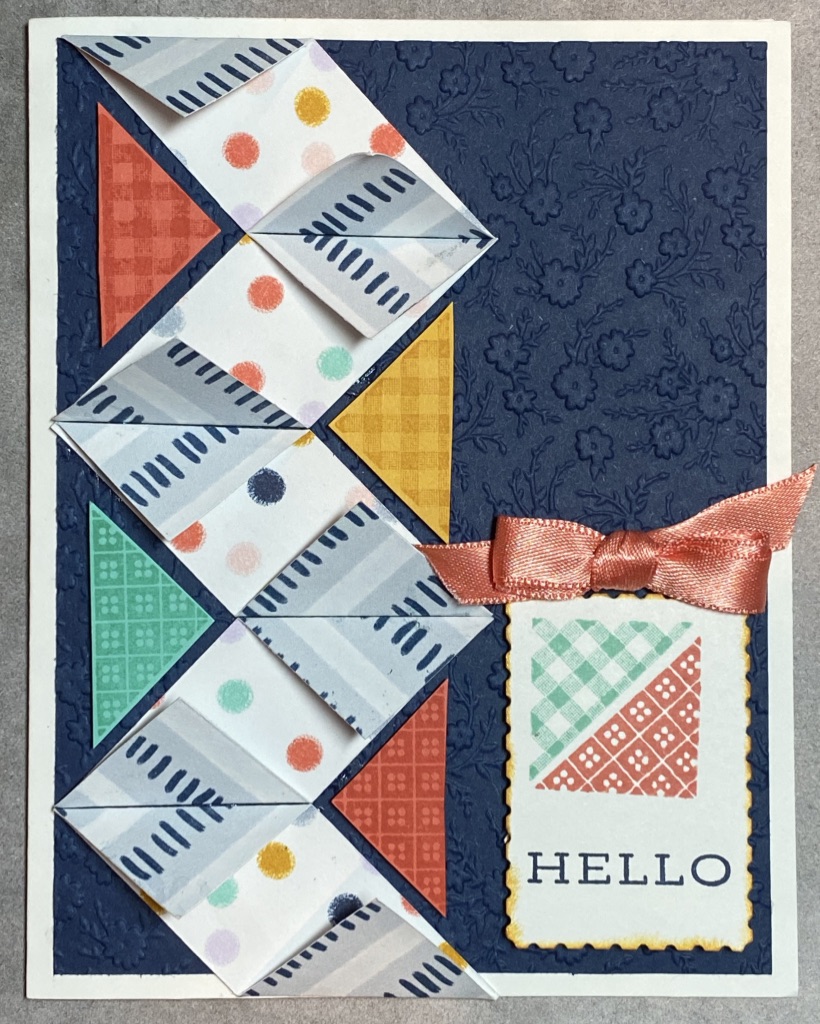
1. The card base is 8 1/2" X 5 1/2" and scored at 4 1/4". Card base is card stock in Just Jade.
2. Cut inside card insert, 5 1/4" x 4" using Whisper White cardstock.
3. Cut a piece of Misty Moonlight card stock, 5 1/4" x 4", using Embossing folder "Greenery". The embossing folder is smaller than the card stock, so allow the extra to extend outside the folder.
4. To make the Chevron pattern, using a piece of DSP, with pattern on both sides, cut 5 pieces 2 1/2" x 1". I used dsp from the 6" x 6", Playing with Patterns.
5. Refer to the video for folding if that helps. Fold 3 strips in triangles right corner to left corner on top, and reverse on the bottom. For the remaining two strips, Fold the top from Left to Right and the opposite on the bottom.
6. Looking at the photo, starting with one of the 3 strips at top of card, and alternate with the opposite fold, and continue alternating to bottom. If you're happy with the look, then go back and using tombow glue or adhesive adhere to the card stock.
7. Using the smaller triangle stamps from "The Right Triangle" stamps stamp four triangles in coordinating color paper stock and ink. For my card, I used Night of Navy, Just Jade and Purple Posy paper and ink.
8. Fussy cut out the triangles and looking at the photo, pop them up with smaller dimensionals and place on card stock.
9. For sentiment, I used "HELLO" from the "Forever Fern "stamp set, stamped using Misty Moonlight Ink on Purple Posey paper scrap and adhered to card with dimensionals. Use whatever sentiment suits you.
10. I made a bow in Just Jade ribbon and adhered to the card with a glue dot.
For the second card I used the smaller triangles from "The Right Triangle" set again, and stamped a pattern, which I show on the video. It is sort of difficult to explain it in text. Here is a photo of the card for reference.
1. Cut the card base, 8 1/2" x 5 1/2" in Misty Moonlight, score at 4 1/4".
2. Cut an inside insert, from Whisper White cardstock, 5 1/4" x 4", and adhere it.
3. Cut another Whisper White Cardstock, 5 1/4" x 4" and adhere it to the front of the card.
4. Use a scrap piece of Whisper White or cut one, 5 1/4" x 1 3/4".
5. If you haven't already, choose dsp and cut a piece 3 1/4" x slightly larger than 1 3/4" (may need to trim when assembling). I used a small pattern from the "Flowers for every season" 6" x 6" dsp.
6. Using the small triangle(s) polymer stamps and colors of ink to coordinate with your DSP choice, stamp your pattern or follow me on the video. Adhere the piece to the left side of the card allowing for 1/8" border.
7. Cut a piece of card stock in a coordinating color ( I used Magenta Madness) to 5" x 2". Layer the cardstock under the dsp and adhere to card. Refer to photo for placement.
8. Using a scrap piece of Whisper White, stamp sentiment and cut to 1 1/2" x 2". Using small stamps you can add little block stamps on sentiment or decorate to suit. I used "Thank You" from "Peaceful Moments" stamp set. I stamped in Misty Moonlight ink.
9. I made a bow in Misty Moonlight ribbon, and adhered to the card with a glue dot.
I hope you have enjoyed this project, feel free to leave me a comment and I'd love to see photos of your cards.
God Bless and Happy Stamping!
Tony
Product List


As you may be aware I am doing two live facebook events a week, and I'm learning lots about how to make a video. I only hope at some point in the future I can look back and see that I have improved over these early attempts!
But I will say I am learning and I think, getting better, AND I'm having fun, and being creative, that's good (for me).
This week on "Wind Down Wednesday", I played with some new products and a new, to me design element, the Chevron.
When I first saw the paper folding it made me think of Origami and though it looks a little complicated, its easy. I had fun playing with colors, texture and patterns, designing the cards. I hope you will enjoy watching the video and maybe learning something new.
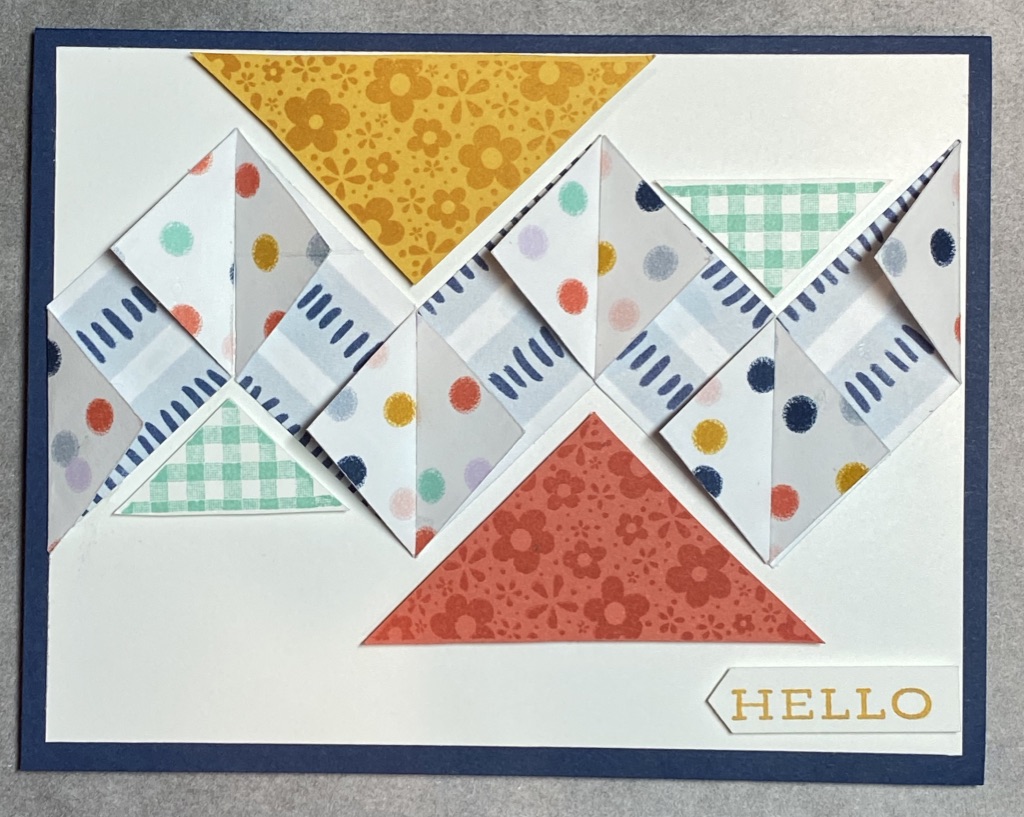
The first card :
1. The card base is 8 1/2" X 5 1/2" and scored at 4 1/4". Card base is card stock in Just Jade.
2. Cut inside card insert, 5 1/4" x 4" using Whisper White cardstock.
3. Cut a piece of Misty Moonlight card stock, 5 1/4" x 4", using Embossing folder "Greenery". The embossing folder is smaller than the card stock, so allow the extra to extend outside the folder.
4. To make the Chevron pattern, using a piece of DSP, with pattern on both sides, cut 5 pieces 2 1/2" x 1". I used dsp from the 6" x 6", Playing with Patterns.
5. Refer to the video for folding if that helps. Fold 3 strips in triangles right corner to left corner on top, and reverse on the bottom. For the remaining two strips, Fold the top from Left to Right and the opposite on the bottom.
6. Looking at the photo, starting with one of the 3 strips at top of card, and alternate with the opposite fold, and continue alternating to bottom. If you're happy with the look, then go back and using tombow glue or adhesive adhere to the card stock.
7. Using the smaller triangle stamps from "The Right Triangle" stamps stamp four triangles in coordinating color paper stock and ink. For my card, I used Night of Navy, Just Jade and Purple Posy paper and ink.
8. Fussy cut out the triangles and looking at the photo, pop them up with smaller dimensionals and place on card stock.
9. For sentiment, I used "HELLO" from the "Forever Fern "stamp set, stamped using Misty Moonlight Ink on Purple Posey paper scrap and adhered to card with dimensionals. Use whatever sentiment suits you.
10. I made a bow in Just Jade ribbon and adhered to the card with a glue dot.
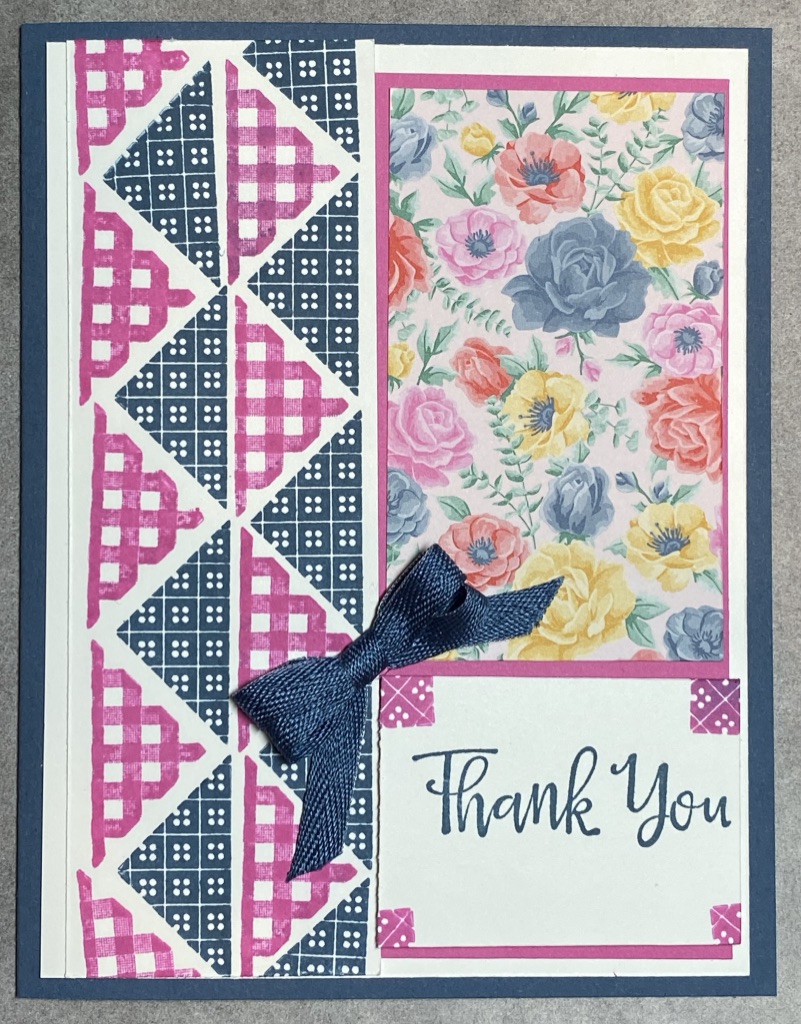
For the second card I used the smaller triangles from "The Right Triangle" set again, and stamped a pattern, which I show on the video. It is sort of difficult to explain it in text. Here is a photo of the card for reference.
1. Cut the card base, 8 1/2" x 5 1/2" in Misty Moonlight, score at 4 1/4".
2. Cut an inside insert, from Whisper White cardstock, 5 1/4" x 4", and adhere it.
3. Cut another Whisper White Cardstock, 5 1/4" x 4" and adhere it to the front of the card.
4. Use a scrap piece of Whisper White or cut one, 5 1/4" x 1 3/4".
5. If you haven't already, choose dsp and cut a piece 3 1/4" x slightly larger than 1 3/4" (may need to trim when assembling). I used a small pattern from the "Flowers for every season" 6" x 6" dsp.
6. Using the small triangle(s) polymer stamps and colors of ink to coordinate with your DSP choice, stamp your pattern or follow me on the video. Adhere the piece to the left side of the card allowing for 1/8" border.
7. Cut a piece of card stock in a coordinating color ( I used Magenta Madness) to 5" x 2". Layer the cardstock under the dsp and adhere to card. Refer to photo for placement.
8. Using a scrap piece of Whisper White, stamp sentiment and cut to 1 1/2" x 2". Using small stamps you can add little block stamps on sentiment or decorate to suit. I used "Thank You" from "Peaceful Moments" stamp set. I stamped in Misty Moonlight ink.
9. I made a bow in Misty Moonlight ribbon, and adhered to the card with a glue dot.
I hope you have enjoyed this project, feel free to leave me a comment and I'd love to see photos of your cards.
God Bless and Happy Stamping!
Tony
Product List


")
")
 Designer Series Paper")
 Designer Series Paper")
 2020–2022 In Color Ribbon")
 2020–2022 In Color Ribbon")
 2020–2022 In Color Ribbon")

Add comment
Read More Great Posts In My Blog


Current Host Code
CODEGOESHERE
Upcoming Classes & Events
| Monthly Card Class 12 May 2024 02:00PM - 04:00PM |

Share This on Social Media
Latest Blog Posts
Newsletter Signup
Project Inspirations
.jpg)
.jpg)
.jpg)
.jpg)
.jpg)
.jpg)
.jpg)
.jpg)
.jpg)
.jpg)
.jpg)
.jpg)
.jpg)
.jpg)
.jpg)
.jpg)
.jpg)
.jpg)
.jpg)
.jpg)
.jpg)
.jpg)
.jpg)
.jpg)
.jpg)
.jpg)
.jpg)
.jpg)
.jpg)
.jpg)
.jpg)
.jpg)
.jpg)
.jpg)
.jpg)
.jpg)
.jpg)
.jpg)
.jpg)
.jpg)
.jpg)
.jpg)
.jpg)
.jpg)
.jpg)
.jpg)
.jpg)
.jpg)
.jpg)
.jpg)
.jpg)
.jpg)
.jpg)
.jpg)
.jpg)
.jpg)
.jpg)
.jpg)
.jpg)
.jpg)
.jpg)
.jpg)
.jpg)
.jpg)
.jpg)
.jpg)
.jpg)
.jpg)
.jpg)
.jpg)
.jpg)
.jpg)
.jpg)
.jpg)
.jpg)
.jpg)
.jpg)
.jpg)
.jpg)
.jpg)
.jpg)
.jpg)
.jpg)
.jpg)
.jpg)
.jpg)
.jpg)
.jpg)
.jpg)
.jpg)
.jpg)
.jpg)
.jpg)
.jpg)
.jpg)
.jpg)
.jpg)
.jpg)
.jpg)
.jpg)
.jpg)
.jpg)
.jpg)
.jpg)
.jpg)
.jpg)
.jpg)
.jpg)
.jpg)
.jpg)
.jpg)
.jpg)
.jpg)
.jpg)
.jpg)
.jpg)
.jpg)
.jpg)
.jpg)
.jpg)
.jpg)
.jpg)
.jpg)
.jpg)
.jpg)
.jpg)
.jpg)
.jpg)
.jpg)
.jpg)
.jpg)
.jpg)
.jpg)
.jpg)
.jpg)
.jpg)
.jpg)
.jpg)
.jpg)
.jpg)
.jpg)
.jpg)
.jpg)
.jpg)
.jpg)
.jpg)
.jpg)
.jpg)
.jpg)
.jpg)
.jpg)
.jpg)
.jpg)
.jpg)
.jpg)
.jpg)
.jpg)
.jpg)
.jpg)
.jpg)
.jpg)
.jpg)
.jpg)
.jpg)
.jpg)
.jpg)
.jpg)
.jpg)
.jpg)
.jpg)
.jpg)
.jpg)
.jpg)
.jpg)
.jpg)
.jpg)
.jpg)
.jpg)
.jpg)
.jpg)
.jpg)
.jpg)
.jpg)
.jpg)
.jpg)
.jpg)
.jpg)
.jpg)
.jpg)
.jpg)
.jpg)
.jpg)
.jpg)
.jpg)
.jpg)
.jpg)
.jpg)
.jpg)
.jpg)
.jpg)
.jpg)
.jpg)
.jpg)
.jpg)
.jpg)
.jpg)
.jpg)
Paper Pumpkin
Paper Pumpkin is the perfect monthly crafting kit for Everyone! No special skills or tools required. Each month a fully complete project kit arrives in a delightful box filled with stamps, ink, and paper—everything cut and ready to go so you can skip right to the fun.
TELL ME MORE SIGN ME UP!
TELL ME MORE SIGN ME UP!